

If you’ve ever wrestled with tent poles at a trade show or outdoor event, you’ve probably wondered: how do inflatable tents work, and could they actually replace that frustrating setup process? The short answer is yes, and the technology behind them is surprisingly straightforward. Instead of rigid poles and complex frame assemblies, inflatable tents use pressurized air beams that act as the structural skeleton, giving the tent its shape and stability in a fraction of the time.
At TMP Inflatables, we’ve been designing and manufacturing custom inflatable structures, including branded event tents and domes, for over 20 years. We’ve seen firsthand how businesses, event planners, and marketing teams benefit from switching to air-supported setups. The questions we hear most often center on reliability: Will they hold up in wind? How long does inflation take? What happens if a beam leaks?
This article breaks down the mechanics of inflatable tents from air beam construction to inflation systems, compares them against traditional pole tents, and covers the maintenance basics that keep them performing event after event. Whether you’re evaluating inflatables for a product launch, trade show, or branded activation, you’ll walk away with a clear understanding of how these structures actually function.
What an inflatable tent is and how it differs
An inflatable tent is a freestanding shelter structure that replaces rigid poles or metal frames with pressurized air tubes called air beams. You pump air into those beams using an electric or hand pump, and the internal pressure is what makes the entire structure stand upright and hold its shape. Once inflated, the tent looks and functions much like a conventional tent, but the structural mechanics are completely different from anything you’d find in a pole-based design.
The basic anatomy of an inflatable tent
Every inflatable tent is built around a few core components working together. The outer fabric shell is typically made from heavy-duty materials like ripstop nylon or coated polyester, chosen for their resistance to tearing and weather exposure. Running through or along the exterior of that shell are the inflatable beams, sealed tubes that follow the tent’s frame path exactly where rigid poles would otherwise sit. A valve system connects each beam to the inflation source, and most modern designs let you inflate all beams through a single entry point.
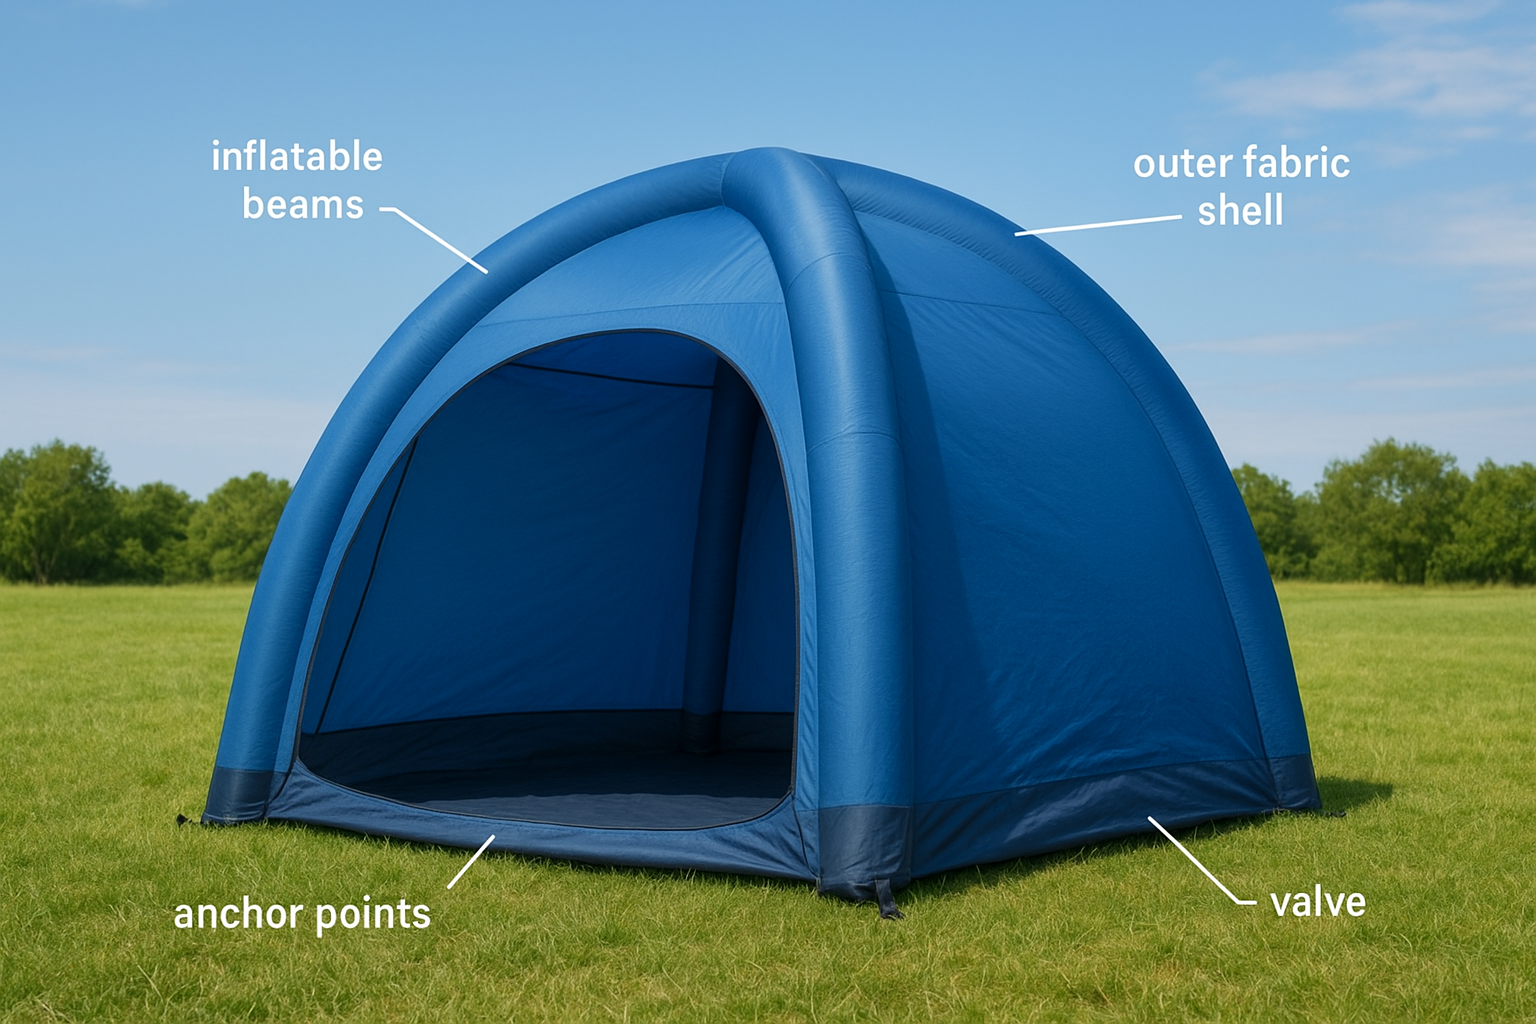
The fabric does more than just cover the structure. It distributes tension evenly across the beams, which keeps the shape consistent under load. You’ll also find anchor points, guy line attachments, and perimeter D-rings built into the base that hold the tent to the ground and prevent shifting in outdoor conditions.
How inflatable tents compare to pole tents
Understanding how inflatable tents work gets much clearer when you place them side-by-side with traditional pole-based options. With a standard pole tent, you manually assemble rigid pole sections that lock together, then thread or clip fabric over the finished frame. That process is time-consuming, often requires multiple people, and leaves you with a pile of components that need careful sorting and packing after each event.
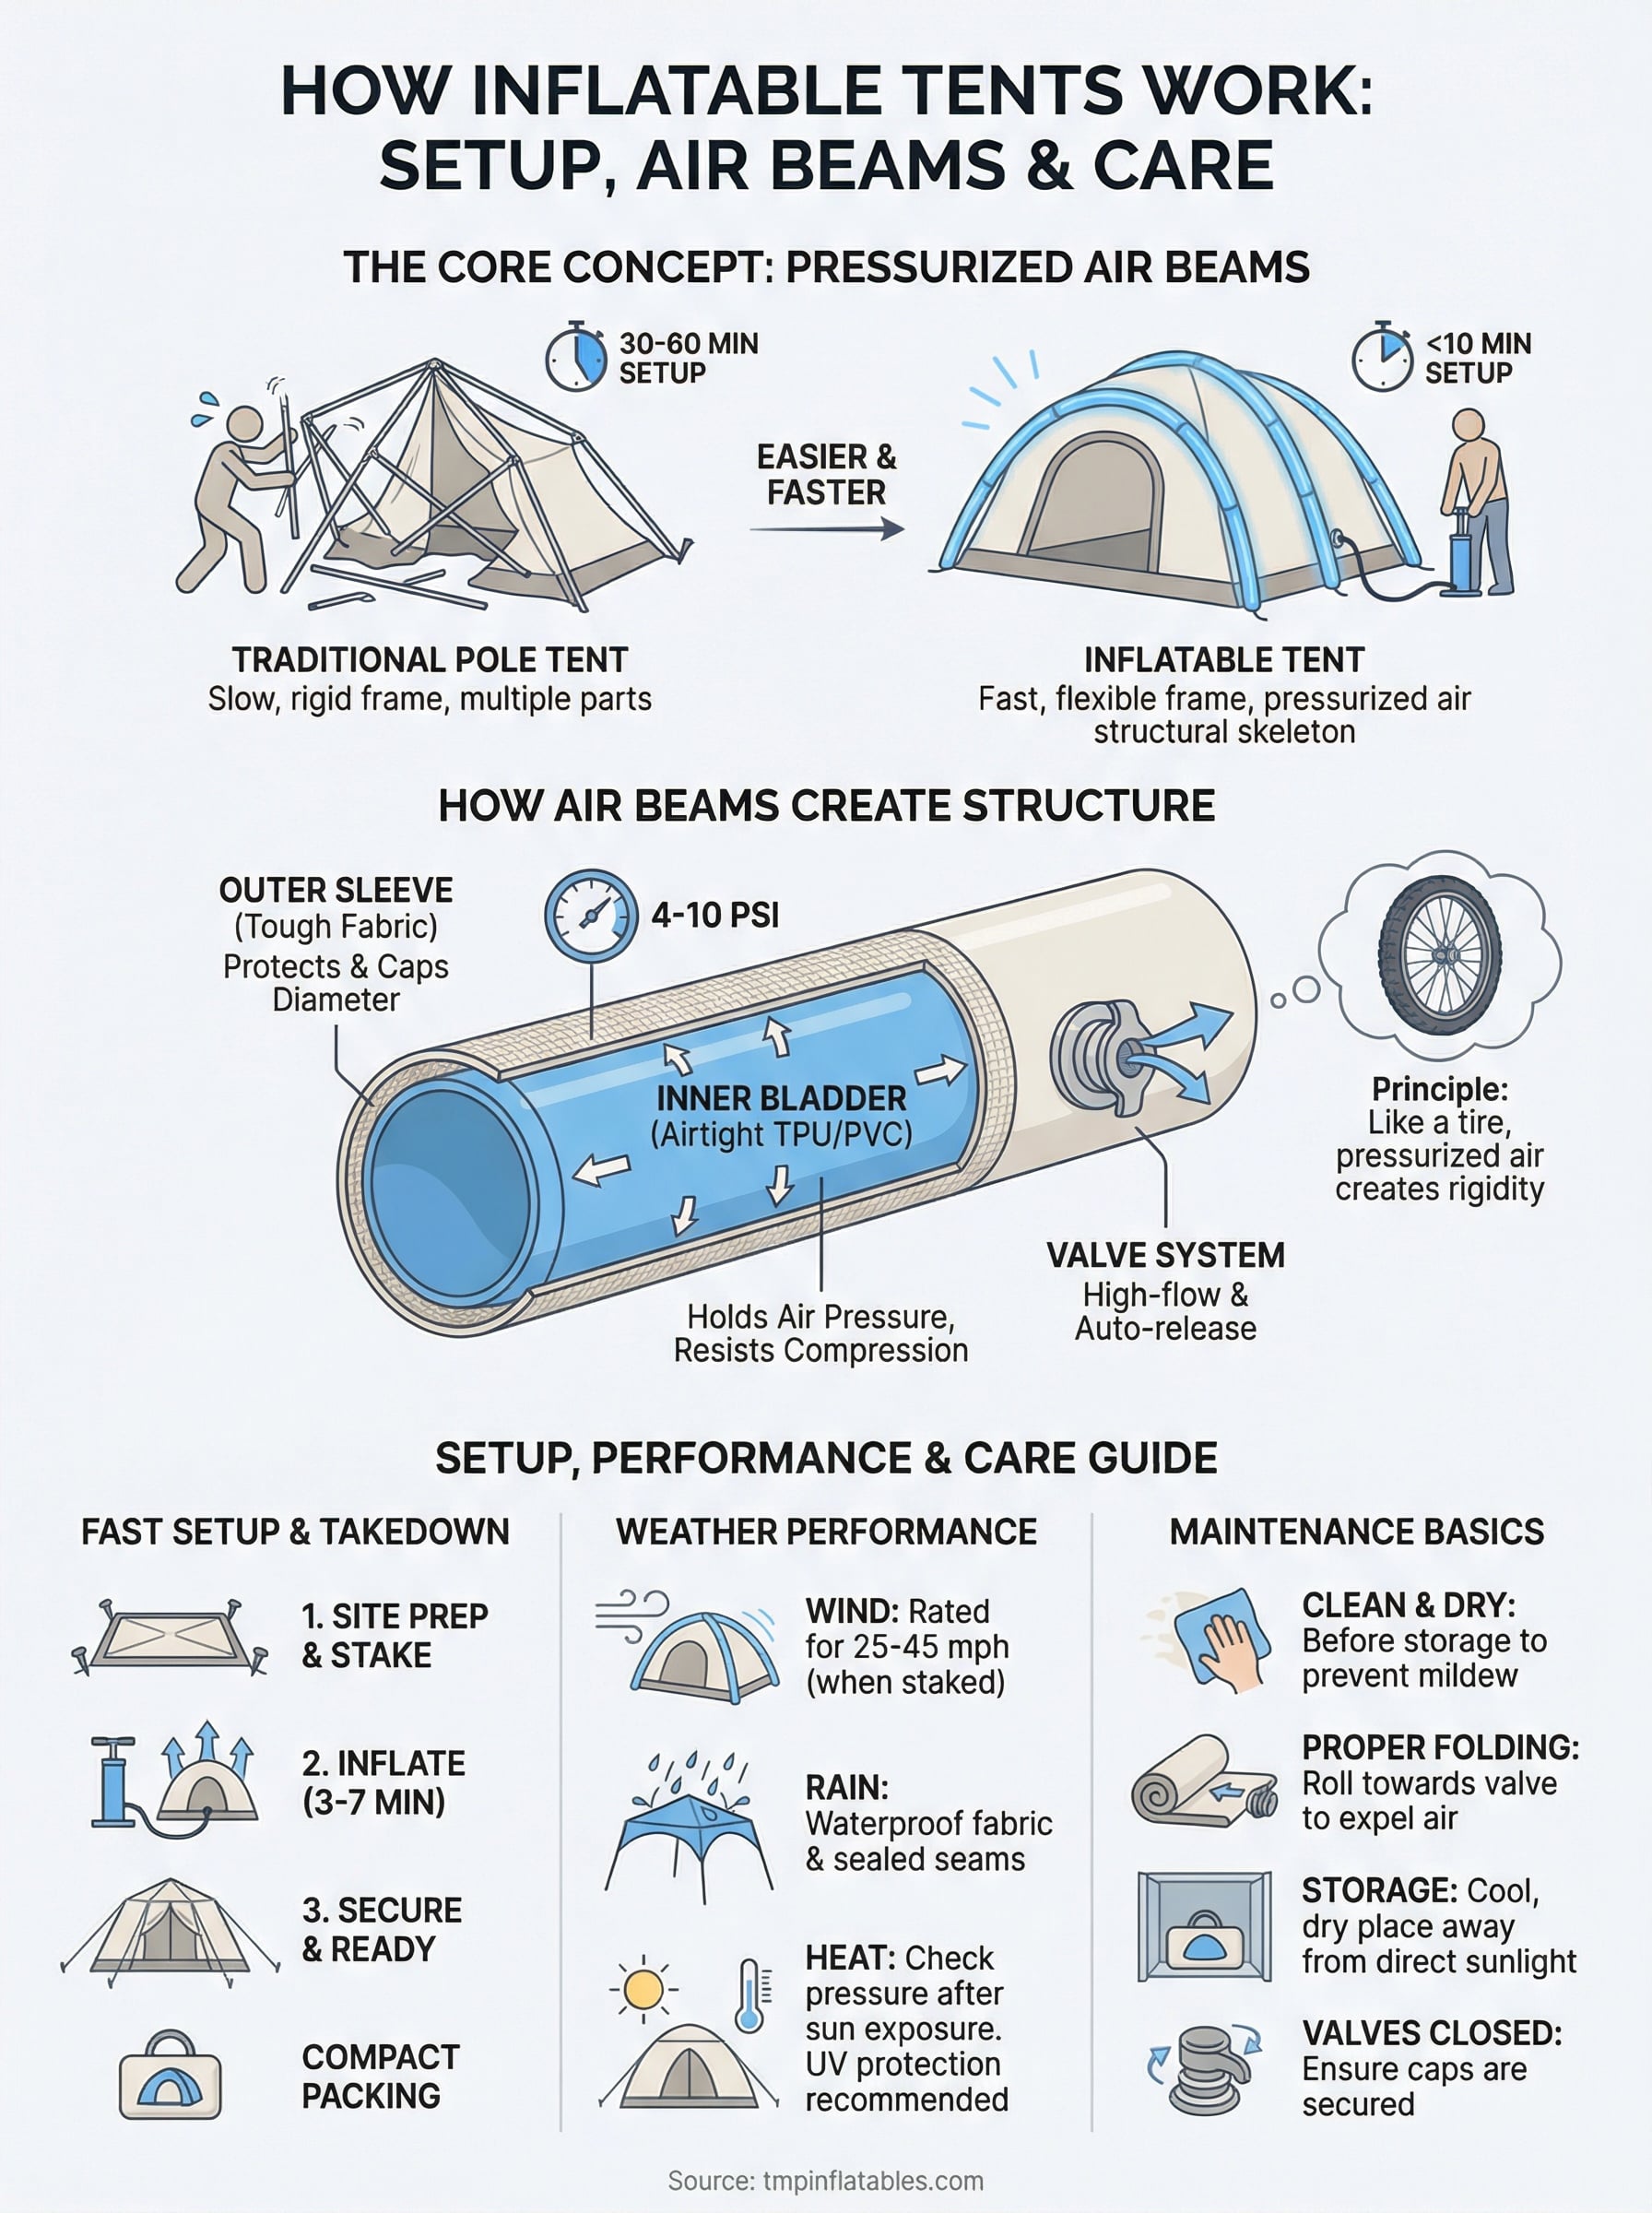
Inflatable tents can typically be set up by one or two people in under ten minutes, compared to the 30 to 60 minutes often needed for a comparable pole structure.
Inflatable designs eliminate separate poles, connectors, and assembly sequences entirely. You unfold the tent, stake it down, connect the pump, and the frame builds itself as air fills the beams. Takedown follows the same logic in reverse: open the valves, let the air out, fold, and pack. The entire structure compresses into a single carry bag that’s far easier to transport than a box of poles, stakes, and loose hardware.
Where businesses and event teams use them
Marketing teams and event organizers deploy inflatable tents across a wide range of settings. You’ll see them at outdoor product launches and brand activations where setup speed matters and the structure itself needs to make a visual statement on arrival. Trade show exhibitors use them as branded booth enclosures because they’re fast to assemble, easy to customize with full-color printed panels, and consistent in appearance across multiple event dates.
Sporting events, outdoor festivals, and corporate field days also rely on these structures because a single person can realistically manage the setup without specialist help. Retailers running parking lot promotions or seasonal pop-ups prefer inflatable tents for the same reason. When your team is moving between multiple event locations during a single campaign, the difference in setup time, required staff, and transport logistics adds up quickly and directly affects your budget and scheduling.
Why air beams get rigid and hold their shape
The physics behind how do inflatable tents work comes down to one core principle: pressurized air resists compression. When you seal air inside a flexible tube and push more air in, the tube walls pull taut and resist deformation. The more pressure you build inside the beam, the harder it becomes to bend or collapse that beam from the outside. This is why a completely deflated beam flops around loosely, while the same beam at full inflation holds a fixed, load-bearing shape.
The role of pressure in structural stability
Most inflatable tent beams are inflated to somewhere between 4 and 10 PSI (pounds per square inch), depending on the tent design and the manufacturer’s specifications. That pressure range might not sound significant, but it’s enough to turn a limp fabric tube into a rigid structural member that can handle real lateral and vertical loads. The internal air molecules push equally outward against all sides of the tube wall simultaneously, creating uniform tension throughout the entire beam and giving it column-like stiffness from top to bottom.
A properly inflated air beam can match the structural performance of an aluminum pole of similar diameter, which is why event organizers and marketing teams trust these tents in demanding outdoor conditions.
Think of a bicycle tire as a practical reference point. At low pressure, the tire compresses easily under your hand. At the correct inflation level, it feels nearly solid. Inflatable tent beams operate on exactly the same mechanical principle, just applied to a structural frame rather than a rolling surface.
Why beams don’t collapse under load
The outer fabric shell actively contributes to keeping beams stable when external forces push against the tent. When wind hits the side wall, the canopy fabric transfers that force across multiple beams and anchor points rather than dumping the full load onto a single beam. This distributed loading prevents individual beams from bending or buckling even during sustained gusts.
Beam geometry adds another layer of stability. Manufacturers route beams along curved or arched paths instead of straight vertical lines. Curved structural elements carry compressive loads far more efficiently than vertical columns alone, which is the same reason arched bridges support more weight than flat spans. Your inflatable tent borrows that same geometric advantage to stay upright through demanding conditions.
How the air beam system is built
Understanding how do inflatable tents work at a material level helps you evaluate which tent will hold up under your specific event conditions. Each air beam is not a single-layer tube. It’s an engineered component built from multiple layers working together, and the quality of those materials directly determines how much pressure the beam holds, how long it lasts, and how it responds when something sharp grazes the surface.
The materials inside the beam
Every air beam starts with an inner bladder, which is the actual airtight chamber that holds pressure. Manufacturers typically construct bladders from TPU (thermoplastic polyurethane) or welded PVC because both materials flex without cracking and seal reliably under sustained pressure. The bladder sits inside an outer sleeve made from high-tenacity polyester or nylon webbing. That sleeve is not airtight, but it handles the structural tension and protects the bladder from abrasion, UV exposure, and surface contact damage.
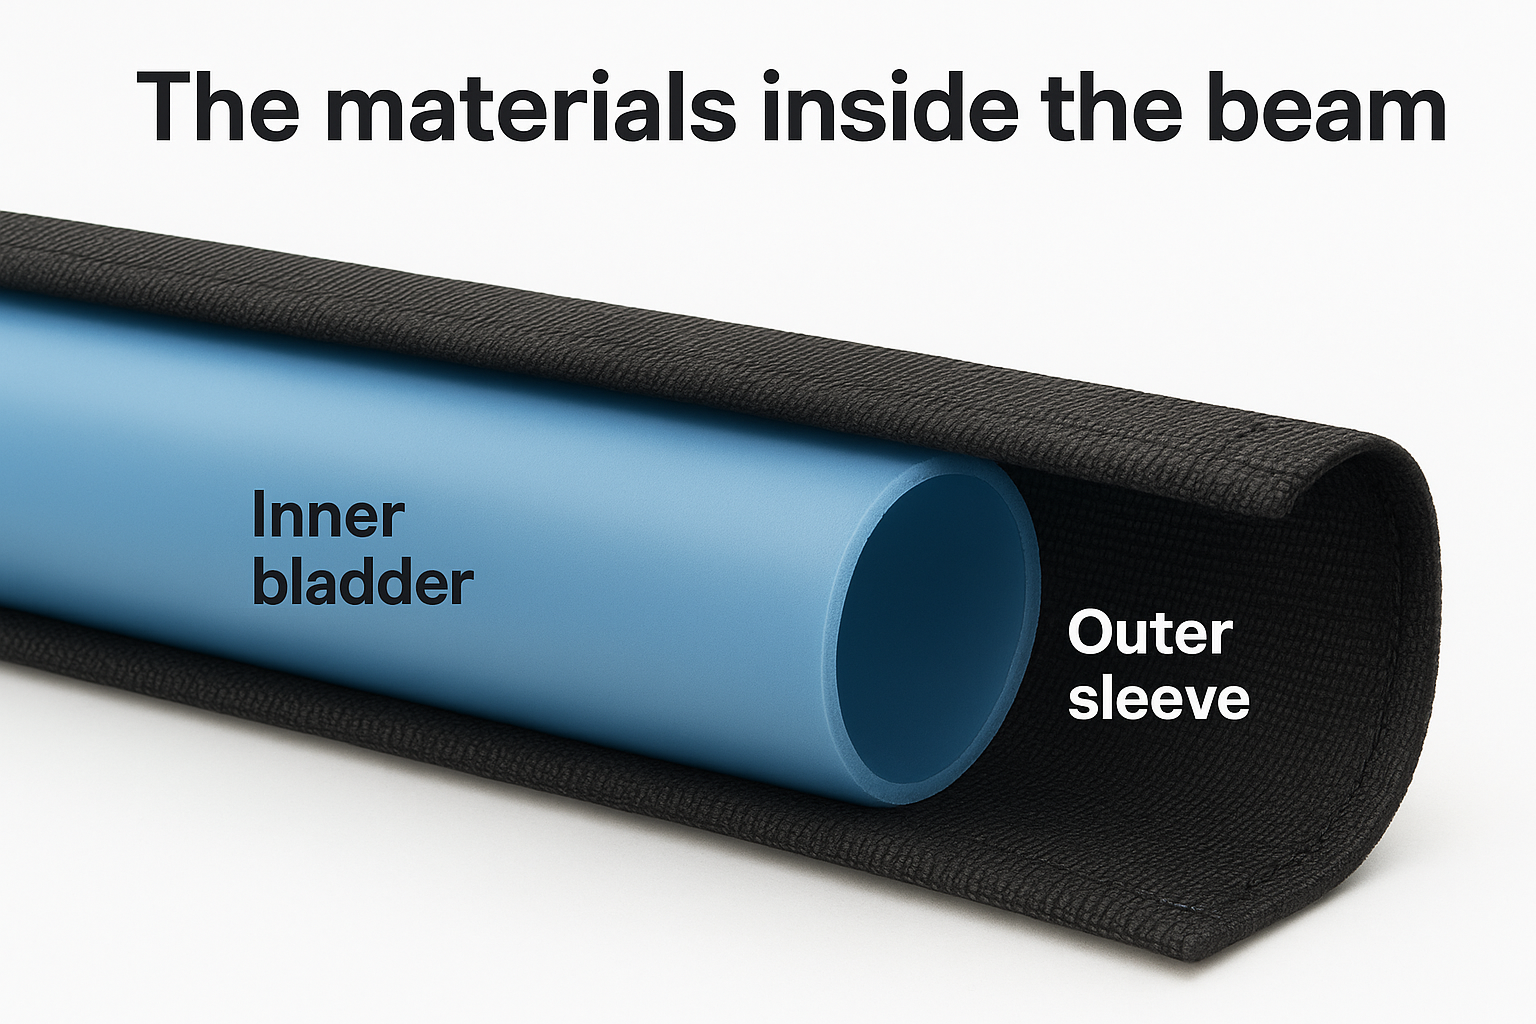
This two-layer construction means a small scratch on the outer sleeve rarely causes a failure, because the inner bladder stays protected behind it.
The sleeve also controls how far the beam can expand. Since the fabric has limited stretch, it caps the maximum diameter of the inflated beam and keeps the geometry consistent across the entire length. Without that constraint, a bladder under pressure would balloon unevenly and lose its structural shape. Together, the bladder and sleeve create a beam with predictable stiffness that behaves the same way every time you inflate it.
Valve systems and pressure management
The valve is the entry and exit point for all air moving through the beam system. Most commercial inflatable tents use high-flow Boston valves or proprietary screw-cap valves positioned at accessible points on the tent frame path. Higher-end designs route all beams through a single manifold valve, meaning you connect your pump once and inflate the entire frame in one continuous process rather than moving from beam to beam.
Pressure relief mechanisms are built into many valve systems as well. These auto-release features let excess air escape if you over-inflate, which prevents bladder stress and keeps the beam pressure within the safe operating range the manufacturer specifies. Checking your tent’s rated PSI before each inflation takes under a minute and protects the beam system across dozens of events.
How to set up and inflate an inflatable tent
Knowing how do inflatable tents work in theory is one thing, but the actual setup process is where the speed advantage becomes real. The full sequence breaks into three stages: site preparation, staking, and inflation, and most setups wrap up in under ten minutes once you’ve done it once.
Site prep and positioning
Before you unpack anything, walk your site and clear the ground of sharp objects, rocks, or debris that could damage the outer sleeve when the tent lies flat. Unroll the tent completely in the footprint where it will stand, and orient the entry panels and branding panels in the direction you want them to face before you stake anything down. Getting the placement right at this stage saves you from deflating, repositioning, and starting over.
With the tent flat and correctly positioned, push your ground stakes through the perimeter anchor points at each corner and along the base. Run your guy lines out from the upper attachment points and peg them at roughly a 45-degree angle away from the tent. Staking down before inflation means the structure rises into its correct shape as the beams fill, rather than shifting positions once it’s already upright.
The inflation process
For most commercial inflatable tents, a standard electric pump reaches full inflation in three to seven minutes, making them dramatically faster to set up than any comparable pole structure.
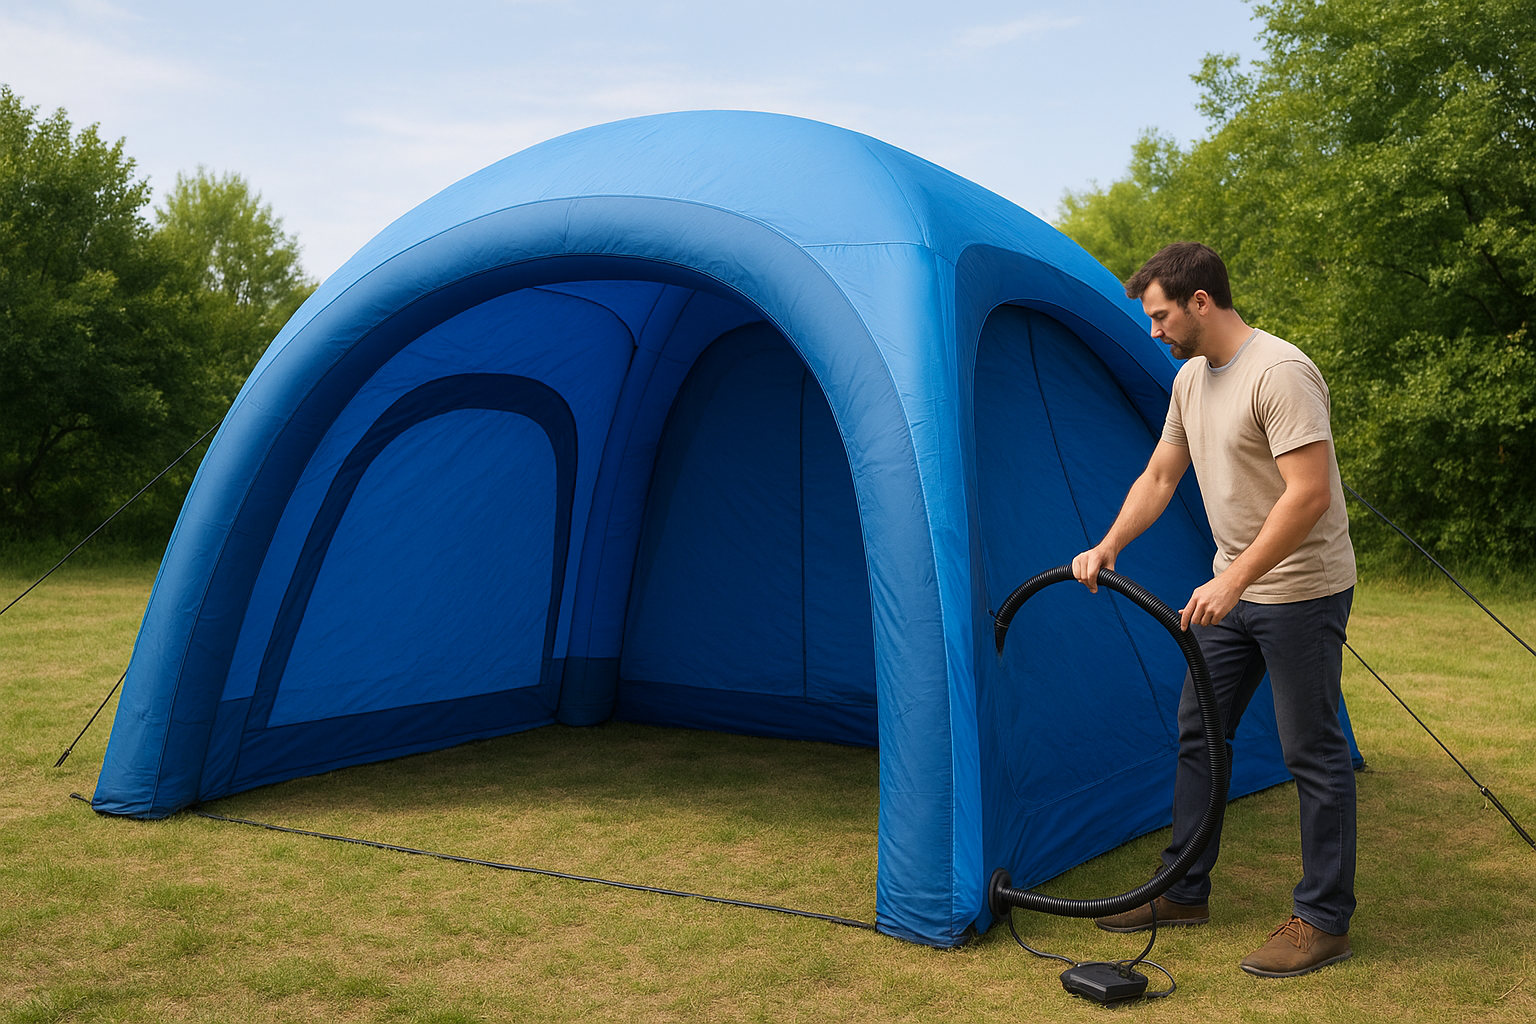
Connect your pump hose to the main inflation valve, which on most designs is a clearly marked port on one of the lower beam sections. Switch the pump on and step back as the beams rise. You’ll see the frame take shape progressively, with the arch beams lifting the canopy off the ground and pulling the fabric tight across the frame as pressure builds. Avoid pressing down on beams while they’re partially inflated, as uneven pressure distribution can cause the tent to shift off its stake points before it’s fully rigid.
When the frame is fully upright, check your pressure with a gauge against the manufacturer’s rated PSI, then close the valve firmly. Walk the perimeter to confirm all stakes are still seated and all guy lines are tensioned evenly. Your tent is ready.
How to deflate, pack, and store it properly
How you handle takedown matters just as much as setup when it comes to getting long-term value from an inflatable tent. Rough deflation and careless packing are the two most common causes of beam damage and valve failure. Giving the process the same attention you give to inflation keeps your tent in deployable condition for dozens of events back-to-back.
Letting the air out safely
Start by removing your guy line pegs and ground stakes before you open any valves. If you release air while the stakes are still in, the tent collapses unevenly and the beam sleeves can fold under tension, creating sharp creases that weaken the outer fabric over time. Once everything is unpegged, open the main inflation valve and let pressure release gradually rather than forcing the beam flat by pressing down with your hands.
Never stand or walk on a partially deflated beam to speed up the process, as direct body weight on a low-pressure beam stresses the inner bladder at unpredictable points and can cause localized tears.
Allow gravity and the weight of the canopy fabric to push the remaining air toward the open valve naturally. On tents with multiple valve points, open them in sequence starting from the beam farthest from the main outlet and working your way toward it, which pushes air efficiently toward the exit rather than trapping pockets inside individual beams.
Folding and storing the tent correctly
With all the air out, fold the tent lengthwise into a flat panel before you start rolling it toward the valve end. Rolling toward the valve pushes any residual air out of the beams rather than sealing it inside. Keep your folds consistent in width so the roll stays even and slides cleanly back into the carry bag without forcing fabric into stressed positions.
Before the tent goes into storage, confirm that all valve caps are fully closed and secured. Even a partially open valve can allow moisture into the bladder interior, which promotes mildew and degrades the TPU lining over repeated cycles. Store your packed tent in a cool, dry space away from direct sunlight, since prolonged UV exposure breaks down the outer sleeve fabric and shortens the life of the beam system significantly. Understanding how do inflatable tents work extends to understanding that the materials need protection between events, not just during them.
How inflatable tents perform in wind, rain, and heat
Understanding how do inflatable tents work in real weather conditions is where most buyers want concrete answers before committing to a purchase. A properly staked and inflated tent handles outdoor conditions better than many people expect, largely because the flexible beam system absorbs and distributes force across the entire structure rather than rigidly resisting it the way poles do.
Wind resistance
When wind pushes against the tent wall, the curved air beams flex slightly and return to their original shape rather than snapping under the load. This flex-and-recover behavior is a structural advantage, not a weakness. Your guy lines do a significant share of the work here, so keeping them tensioned correctly before weather arrives is not optional.
Most commercial inflatable tents are rated for sustained winds between 25 and 45 mph, depending on design, staking quality, and ground conditions. Checking your specific model’s wind rating before each outdoor deployment keeps your setup within safe operating limits.
Tents that are improperly staked lose their wind resistance rating entirely, regardless of how capable the beam system is.
Rain and waterproofing
The outer fabric shell on most inflatable tents uses coated polyester or nylon with a waterproof membrane layer bonded to the underside. Seams on quality tents are heat-sealed or taped to prevent water from tracking through stitch holes under sustained rainfall. Water runs off the curved canopy surface naturally, so pooling is less of a problem on inflatable domes and arch-frame designs than it is on flat-canopy pole tents.
Storing damp fabric traps moisture against the beam sleeves and valve seals, which leads to mildew growth inside the structure and degrades both the coating and the bladder lining over repeated storage cycles. After any event in wet conditions, dry the tent completely before folding and packing it away.
Heat and UV exposure
Direct sun and high ambient temperatures affect inflatable tents in two distinct ways. First, air inside the beams expands as it heats up, which can push internal pressure slightly above your pump’s set point. Checking pressure once the tent has been in direct sun for 20 to 30 minutes lets you release any excess before it stresses the bladder seams. Second, prolonged UV exposure breaks down the outer sleeve fabric faster than normal wear does, so applying a UV-protective spray coating to the exterior before summer events extends the working life of your beam system noticeably.
Next steps
Now that you understand how do inflatable tents work, from air beam construction to weather performance and proper storage, you have everything you need to make a confident decision for your next event or campaign. The mechanics are straightforward, the setup is fast, and the structural performance is reliable when you follow the pressure guidelines and staking practices covered in this article.
Your next move is finding the right structure for your specific use case. Branded inflatable tents, domes, and event structures vary significantly in size, shape, and print options, so working with a manufacturer that handles custom design in-house makes a real difference in the final result. If you need a structure that does more than shelter people and actually reinforces your brand the moment someone walks past it, explore custom inflatable event tents and structures at TMP Inflatables to see what’s possible for your next activation.