

You’ve seen them at finish lines, festival entrances, and Halloween displays: giant air-filled structures that mark an entrance and stop people mid-scroll or mid-walk to take a photo. An inflatable archway does exactly that, and it’s become one of the fastest ways to brand an event space without building anything permanent. If you’re planning a race, a store opening, a corporate activation, or a spooky front-yard display, you’ve probably already started searching for one and hit a wall of vague product pages and confusing pricing.
This guide answers the real questions people ask before they commit: what an inflatable archway actually is, how it’s built, and whether buying versus renting makes more sense for your event calendar and budget. We’ll walk through the practical differences between a one-off race arch and a custom-branded structure meant to travel with you all season.
By the end, you’ll know exactly what to look for in materials, sizing, and setup requirements, what questions to ask a supplier, and how to avoid the common mistakes that leave event teams scrambling on-site. We’ll also cover realistic cost ranges and turnaround times, so you can plan with numbers instead of guesswork.
Inflatable Archway Guide & Why inflatable archways make events unforgettable
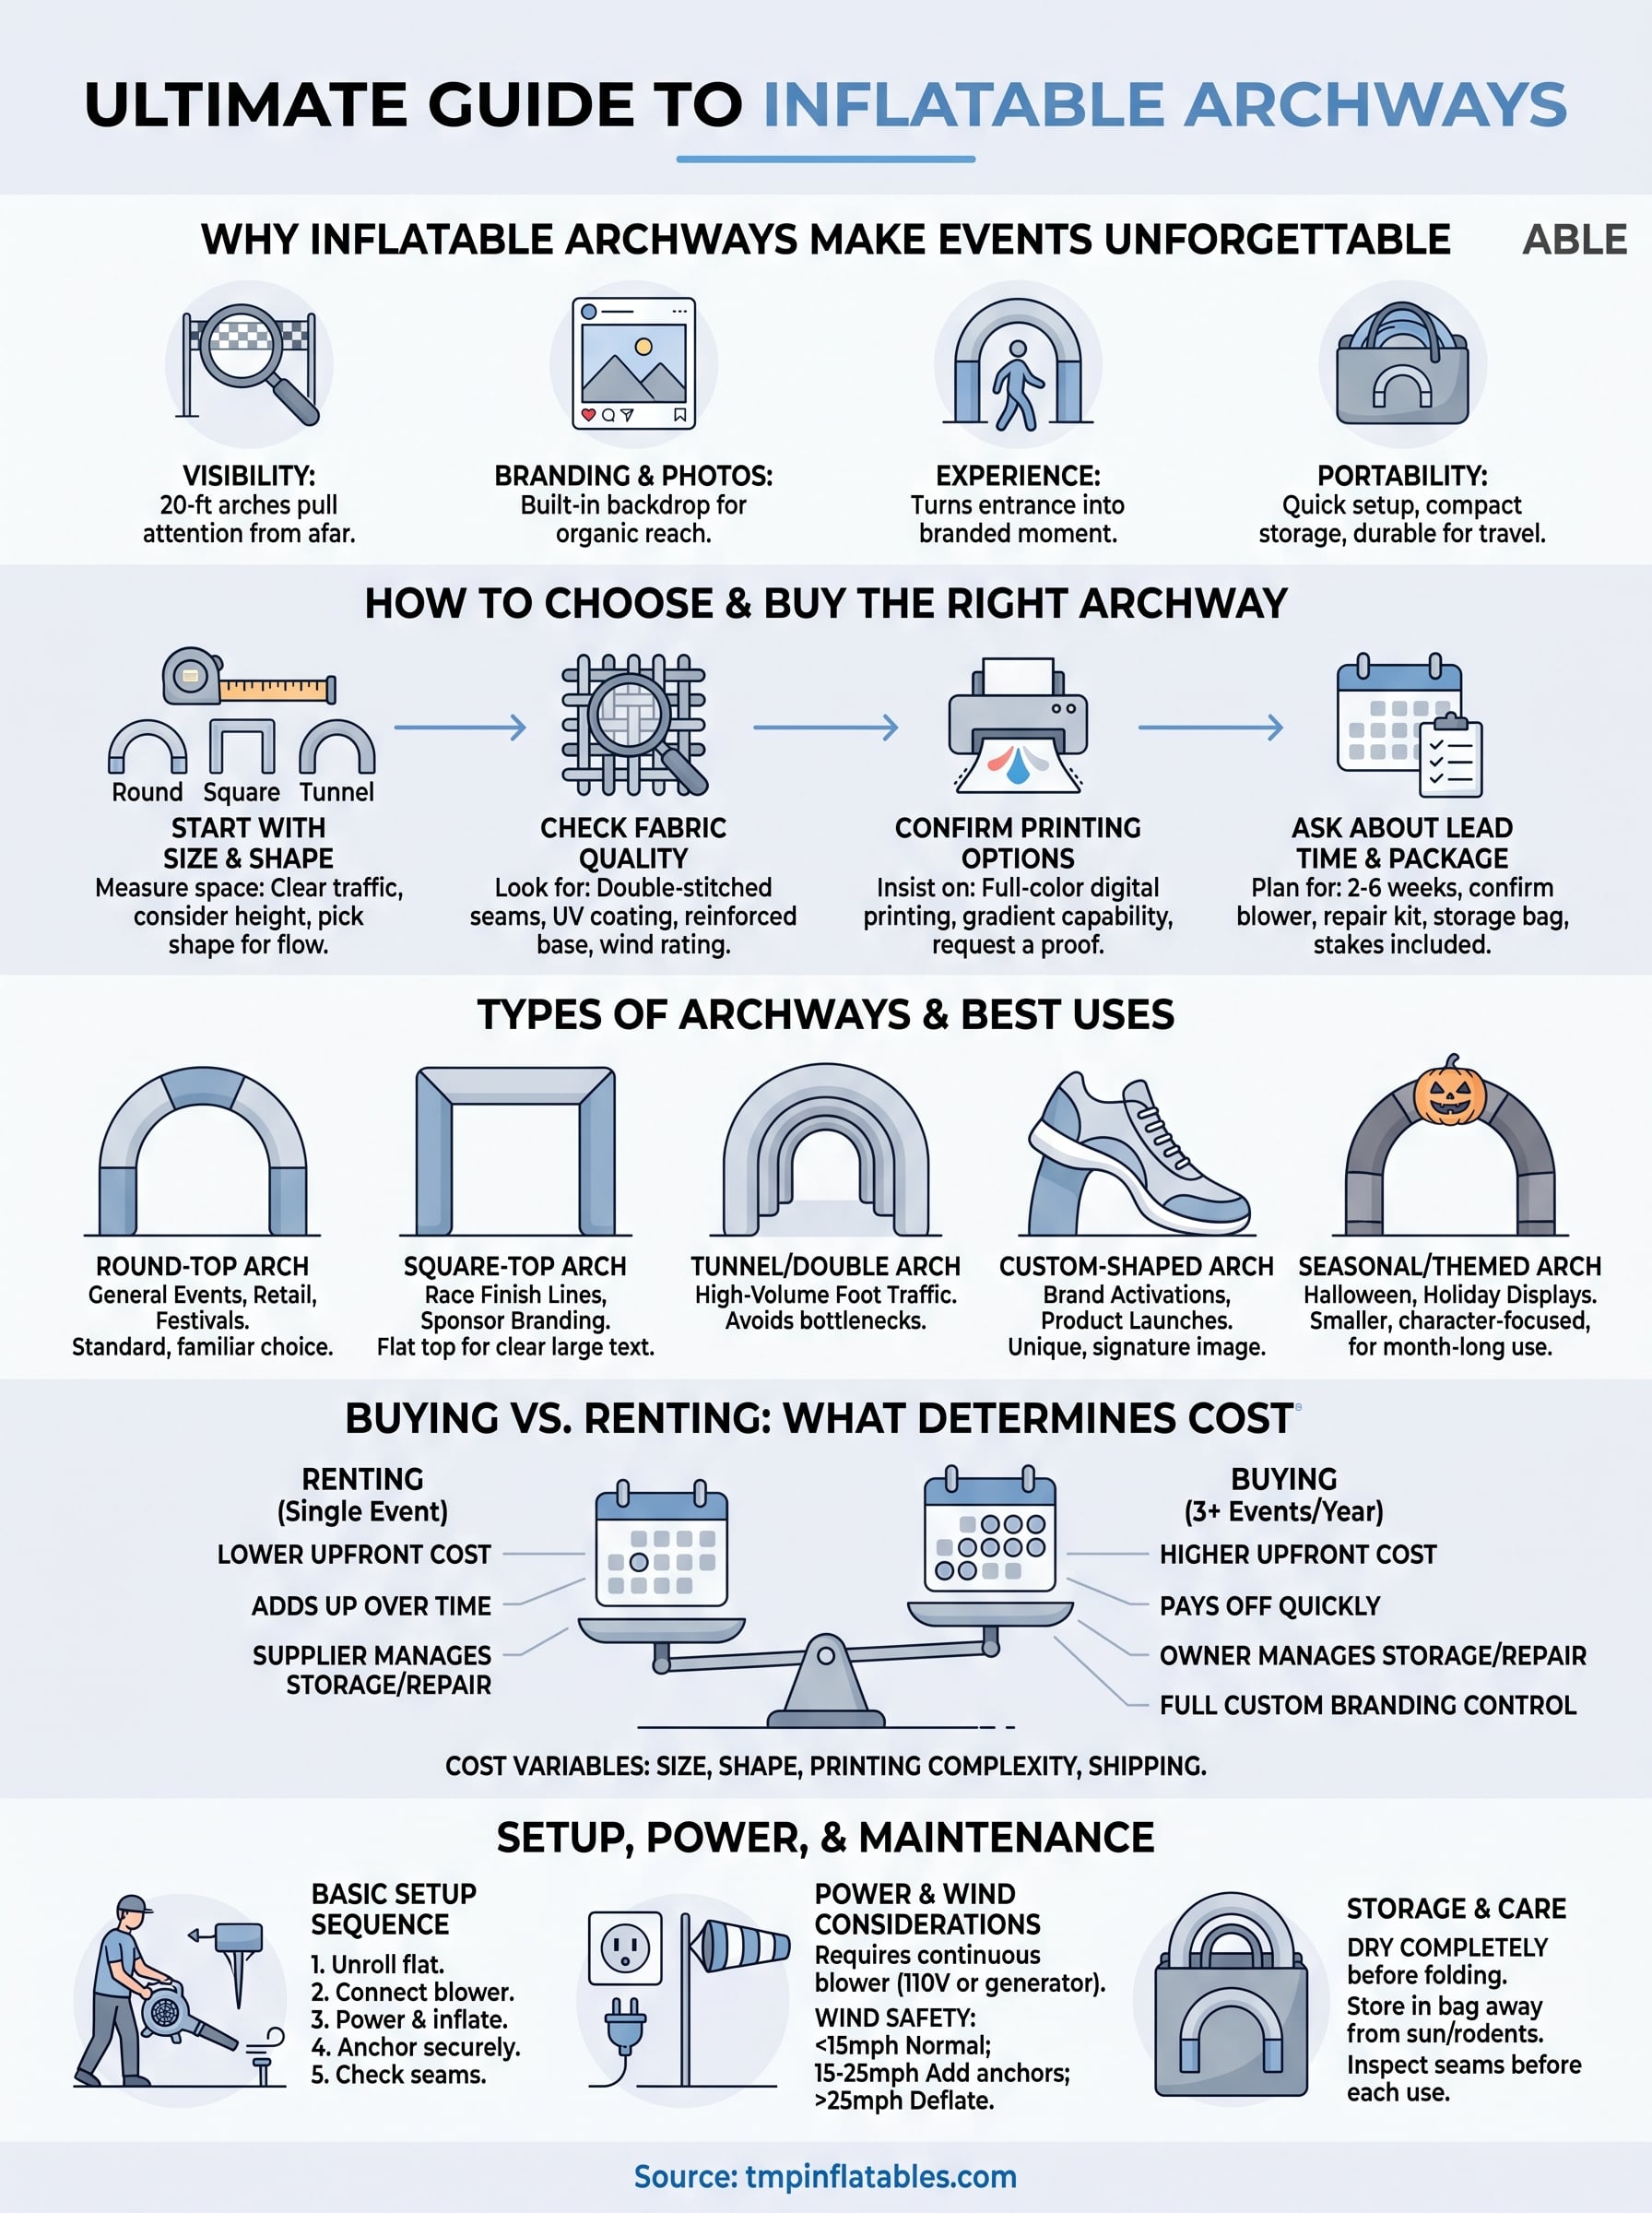
Nothing on a sidewalk or finish line competes with a 20-foot arch. Inflatable archways create a focal point that pulls eyes from across a parking lot or a race route, doing in seconds what a row of banner stands can’t do in an hour. Unlike a flat sign, the arch has depth and motion, the fabric ripples slightly in the wind, and the sheer scale forces people to walk through it or stop and photograph it. That’s the whole point of an event entrance: it turns a walkway into a branded experience rather than a place people just pass through.
A 20-foot inflatable arch does in three seconds what a banner wall takes a full minute to communicate.
Inflatable Archway Guide Built for races, retail launches, and Halloween lawns alike
Race organizers were among the first to prove the format works, using a finish line arch to mark the exact moment a runner completes months of training, and that emotional payoff is why the image ends up on every runner’s social feed. Retailers borrowed the same idea for store openings and parking lot sales, positioning an arch at the entrance so shoppers know exactly where to go from three blocks away. Homeowners and haunted attraction operators use scaled-down versions every October, turning a front yard into a Halloween archway display that costs less than a single custom-built prop and packs away in a duffel bag by November first.
Inflatable Archway Guide & Photo-worthy moments that extend your reach past the event itself
Every arch works as a built-in photo backdrop, whether or not you planned it that way. Attendees stop, pose, and post, which means your branding travels onto Instagram and Facebook without any extra spend. Marketing teams have caught onto this: a well-lit branded archway at a product launch generates more organic social reach than the paid ads that got people there in the first place. Because the structure is the whole environment, not just a small placement, the photos naturally include your logo, colors, and event name in a way a stage banner rarely manages.
Inflatable Archway Guide & Practical advantages that go beyond looks
Portability sets inflatables apart from any permanent or built structure. A custom inflatable arch packs down to a bag two people can carry, and it inflates in under fifteen minutes with a single blower, no forklift, no rigging crew, no bolts into pavement. Durability matters just as much: quality units are built from reinforced PVC or oxford fabric rated for outdoor wind and sun exposure, so the same arch can work a spring 5K, a summer festival, and a fall retail launch without replacement. Reusability changes the math on cost too, since one arch that survives a full event season lowers your per-event branding spend to a fraction of renting fresh signage every time.
Below is a quick look at how the same structure serves different goals depending on where you use it. This is an quick reference chart courtesy of this Inflatable Archway Guide.
| Setting | Primary goal | Typical width |
|---|---|---|
| Race finish line | Mark completion, photo moment | 15-20 ft |
| Retail grand opening | Guide foot traffic, brand entrance | 10-15 ft |
| Corporate activation | Backdrop, social sharing | 12-18 ft |
| Halloween front yard | Seasonal display, neighborhood draw | 8-10 ft |
Consider how each of these settings shares the same underlying need: a structure big enough to notice, light enough to move, and branded enough to matter. That combination is exactly why inflatable archways keep showing up at everything from small-town fun runs to national product launches, and why more event planners now put arch rentals at the top of their checklist instead of treating them as an afterthought.
Inflatable Archway Guide How to choose and buy the right one
Starting with the wrong size or fabric is the most expensive mistake you can make on this purchase. Buying an inflatable archway is a different decision than renting one for a weekend, because you’re committing to storage, transport, and years of setup, so the specs matter more than the price tag on the first quote you get.
The cheapest arch on the market is never the cheapest arch once you factor in a season of repairs.
Inflatable Archway Guide to Start with size and shape
Measure your entrance space before you contact anyone, not after. A custom arch size needs to clear traffic realistically: think about vehicle height if cars pass under it, crowd width if runners come through three abreast, and ceiling height if you’re using it indoors at a trade show. Standard widths run from 8 to 20 feet, and standard shapes include the classic rounded arch, a square-top frame, and a tunnel-style double arch for wider entrances. Get this wrong and you’ll either choke your own foot traffic or end up with a structure that looks small in photos.
Inflatable Archway Guide to Check the fabric and construction quality
Ask your supplier directly what fabric they use before you ask about price. Oxford fabric and reinforced PVC are the two standards in the industry, and the difference shows up after your third or fourth event, not on day one. Look for:
- Double-stitched seams at every stress point, not just the main panels
- UV-resistant coating if the arch will spend full days in direct sun
- Reinforced base panels where the arch meets the ground, since that’s where wind stress concentrates
- A weight rating the supplier can quote in mph wind tolerance, not just “outdoor rated”
A supplier who can’t answer these questions with specifics is a supplier who hasn’t tested their own product outdoors.
Inflatable Archway Guide to Confirm printing and branding options
Digital printing has replaced the old method of gluing on separate logo panels, and it’s worth insisting on. Full-color digital printing lets you wrap the entire arch in gradient backgrounds, photo-quality graphics, or a sponsor lineup without visible seams breaking up the artwork. Ask to see a proof before production starts, and ask whether the color you see on screen matches what prints on fabric, since PVC and Oxford take ink differently and a good shop will tell you that upfront instead of letting you find out later.
Inflatable Archway Guide be sure to Ask about lead time and turnaround
Custom production takes real time, and rush jobs cost more for a reason. A straightforward stock-shaped arch with your logo added can often ship in 2 to 3 weeks, while a fully custom shape or an unusual size can run 4 to 6 weeks depending on the supplier’s production queue. If your event date is fixed, get the delivery date in writing, not just a verbal estimate, and build in a buffer of at least a week for shipping delays, especially if you’re ordering across the border or during a busy summer season. You need to think carefully, best to save this Inflatable Archway Guide.
Inflatable Archway Guide be sure to Confirm what’s included in the package
A finished arch is only half the purchase. Before you sign off, confirm the order includes the blower motor rated for the arch’s size, a repair kit with matching fabric patches, storage bags, and stakes or sandbags for outdoor anchoring. Suppliers who bundle these as standard, rather than as upsells, are usually the ones who’ve done this long enough to know what actually breaks in the field.
Inflatable Archway Guide & Types and their best uses
Not every archway serves the same purpose, and picking the wrong shape wastes money whether you’re buying or renting. Classic round arches work for almost any entrance, but square-top frames, tunnel arches, and specialty shapes each solve a specific problem that a generic arch can’t. Knowing which category fits your event before you call a supplier saves you a round of back-and-forth quotes and gets you a structure that actually matches how people will move through it.
The shape you pick should match the traffic flow, not just the branding you want to show off.
Inflatable Archway Guide favorite: Round-top arches for general events
The rounded arch is the default for a reason: it reads as a classic entrance from any angle and prints well because the curve gives artwork a natural frame. Retail openings, community festivals, and school events lean on this shape because it’s affordable, fast to produce, and familiar enough that attendees instinctively walk toward it. If you only plan to own one archway for multiple event types across the year, this is the safest starting shape.
Inflatable Archway Guide favorite: Square-top and tunnel arches for races and high-traffic entrances
Square-top frames give you a flat surface across the top, which is where a finish line arch puts its biggest branding element, usually the event name in large lettering that reads clearly in race photos. Tunnel-style double arches extend the structure’s depth, creating a short walk-through corridor instead of a single frame, and that extra length matters when a wide field of runners needs to pass through three or four abreast without bottlenecking. Both shapes cost more to produce than a basic round arch because they use more fabric and require reinforced framing to hold their form under wind.
Inflatable Archway Guide favorite: Custom-shaped and character arches for brand activations
When a brand wants an arch that doesn’t look like every other arch at the trade show, custom shapes are where the investment goes. A custom inflatable arch can mimic a product silhouette, a mascot, or a logo shape entirely, turning the entrance itself into a three-dimensional piece of branding rather than a frame that happens to have a logo printed on it. These builds take longer and cost more, but for a national product launch or a flagship activation, the arch becomes the campaign’s signature image rather than a background element. Knowing this key point is a real unlock provided by this Inflatable Archway Guide.
Inflatable Archway Guide favorite: Seasonal and themed arches for Halloween and holiday displays
A Halloween archway trades size for character, favoring skeletal frames, pumpkin motifs, or haunted-house detailing over sheer scale. These smaller units, often in the 8 to 10 foot range, are built to survive a month of nightly outdoor use in cooler fall weather rather than a single event day, so check that the fabric and blower are rated for extended overnight operation if you’re running it every evening through October.
| Arch type | Best use case | Typical width |
|---|---|---|
| Round-top | General events, retail, festivals | 10-15 ft |
| Square-top | Race finish lines, sponsor branding | 15-20 ft |
| Tunnel/double | High-volume foot traffic | 15-25 ft |
| Custom-shaped | Brand activations, product launches | Varies |
| Themed/seasonal | Halloween, holiday displays | 8-10 ft |
Matching the shape to the job upfront means you’re not paying for square footage or custom framing you’ll never actually use.
Inflatable Archway Guide & What determines the cost to buy or rent an archway
Price questions dominate every first call with a supplier, and for good reason: the range between a basic arch and a fully custom one can be five times wider than most buyers expect. Inflatable archway cost depends on size, fabric, printing complexity, and whether you’re buying outright or renting for a single weekend, so a quote that looks cheap on the surface often skips one of those variables entirely. Understanding what drives the number lets you compare suppliers on substance instead of just the total at the bottom of the page.
The size of the quote almost always tracks the size of the arch, but printing complexity is the variable that catches buyers off guard. Knowing this can really make a difference, lucky you consulted this Inflatable Archway Guide.
Inflatable Archway Guide to Size and shape drive the base price
Larger arches use more fabric, more seam work, and heavier framing to stay stable, so a 20-foot arch will always cost more than a 10-foot version in the same fabric. Shape adds its own multiplier: a basic round-top costs less to produce than a square-top or tunnel arch because those shapes need extra reinforcement to hold form under wind. Custom-shaped arches, the kind built to mimic a product or mascot, sit at the top of the range because every panel is a one-off pattern rather than a repeatable template.
Inflatable Archway Guide to Printing and branding complexity change the number fast
A single logo on a plain-color background costs far less to print than a full-wrap design with gradients, sponsor logos, and photo-quality artwork. Full-color digital printing covers more surface area per job when the design is dense, and that print time adds directly to the invoice. If you’re working with a tight budget, ask your supplier which design choices save money without cutting the visual impact, since a clean logo placement often photographs just as well as a busy full wrap.
Inflatable Archway Guide to Buying versus renting changes the entire cost structure
Renting makes sense for a single event with no repeat use in sight, since you avoid storage, transport, and blower maintenance between uses. Buying pays off once you’re running three or more events a year, because the archway rental cost for a single weekend often runs close to a fifth of the purchase price, and that math flips in your favor fast once you’ve used the arch more than five times. Knowing this math makes you a pro by consulting this Inflatable Archway Guide.
| Cost factor | Rent | Buy |
|---|---|---|
| Single-event cost | Lower | Higher upfront |
| 5+ events per year | Adds up fast | Pays off quickly |
| Storage responsibility | None | Yours |
| Custom branding | Limited options | Full control |
| Repair costs | Supplier’s problem | Yours to manage |
Inflatable Archway Guide Shipping and location add real cost too
Cross-border shipping, rural delivery addresses, and rush timelines all add line items that catch first-time buyers off guard. TMP Inflatables ships across Canada, the United States, the Caribbean, and Latin America, but even with an established logistics network, remote locations and compressed timelines push freight costs higher than a standard ground shipment. Factor delivery into your budget early, especially if your event date leaves no room for a delayed truck.
Inflatable Archway Guide to Setting up, powering, and maintaining your archway
Getting an arch upright is simple, but getting it upright correctly is what separates a smooth event morning from a scramble ten minutes before doors open. Inflatable archway setup usually takes one or two people about ten to fifteen minutes once you’ve done it a few times, and the process stays the same whether you’re working a race start line or a store parking lot. Know the steps before event day, not during it, this is a secret within this Inflatable Archway Guide.
Inflatable Archway Guide and The basic setup sequence
Most arches follow the same routine regardless of size or shape:
- Unroll the fabric on a clean, flat surface, away from sharp gravel or debris
- Connect the blower hose to the intake valve and secure the clamp
- Power on the blower and let the arch fill fully before adjusting position
- Anchor with stakes on grass or sandbags on pavement, at every base point the supplier marks
- Check seams and the base for full inflation before opening the space to foot traffic
Skipping the anchoring step is the single most common reason an arch ends up on its side by mid-afternoon.
Inflatable Archway Guide and Power needs and blower requirements
Every inflatable arch runs on a continuous blower motor, not a one-time fill, which means power access matters as much as the arch itself. Standard blowers for a 10 to 15 foot arch run on a regular 110V household circuit and draw roughly the same power as a window air conditioner. Larger arches, especially tunnel and custom shapes, may need a heavier-duty blower or even a generator if you’re setting up somewhere without outlet access, like a beach, a field, or a parking lot with no nearby building. Always confirm your supplier includes a blower rated for your specific arch size, since an undersized motor leaves the fabric looking soft and wrinkled instead of taut and photo-ready.
Inflatable Archway Guide Storage and care between uses
Proper storage is what makes an arch last through multiple seasons instead of one. Dry the fabric completely before folding it away, since trapped moisture leads to mildew that weakens seams over time. Store the folded arch in its included bag, away from direct sunlight and away from rodents if it’s in a garage or shed. A quick seam and valve inspection before each new event catches small tears while they’re still a patch-kit fix rather than a full panel replacement, which keeps your archway maintenance costs close to zero across a full year of use, a key point within this Inflatable Archway Guide.
Inflatable Archway Guide & Finding the right archway for your event
An inflatable archway earns its keep fast: it draws eyes, frames photos, and marks an entrance in a way flat signage never manages. The real decision isn’t whether an arch works for your event, it’s matching the right size, fabric, and shape to how people actually move through your space, then deciding if buying or renting fits your event calendar for the year ahead.
Before you commit to a supplier, revisit your measurements, your wind exposure, and how many events you’ll realistically run this arch through. Those three answers point you toward the right shape and the right ownership model faster than any price comparison will.
Once you know what you need, don’t guess at pricing from a generic product page. Get a custom quote from TMP Inflatables and get real numbers, real turnaround times, and a structure built for your event, not someone else’s. Looking for more inspiration on arches? Check out this board
